Friday, October 30, 2009

Stamping on Basswood

Isn't that the most pitiful name for a blog post ever??!!
My last post had Basswood (doesn't that sound like the name of a fish or maybe a weird bird) as a layer on a card - this time I decided to stamp directly onto the wood. A Nestabilities die added some fun embossing (I put some scotch tape on the back to make sure the center doesn't pop out later since the grain of the wood is compromised from the embossing).
A clear Spica marker added a little bling to the plain main panel. You don't need any fancy inks for this - Momento Dye Ink in Bamboo Leaves worked just fine.
The tree stamp is from Hero Arts - sentiment and ribbon from A Muse.

Wednesday, October 28, 2009

Pretty Pears

Recently I saw on a blogpost wedding invitations printed on thin sheets of wood - I thought that was a really cool idea and purchased a sheet of 4" x 24" veneer. Serendipity has just gotten in Textured Pear paper by Reminisce - its background looks just like woodgrain so I had to play when I got home this afternoon!
After punching with 1 1/4" square punch the corners were rounded on three sides. I was adhering to the new A Muse shimmer paper when I realized that this pear paper was double-sided!! Even better than I thought originally - The biggest layer against the white cardstock is my veneer - It was a bit tricky to cut on my rotary cutter - I'll admit I had to do it twice because the first one split in the corner.
Makes for a cool look - even better in real life! Look at the view Kim has outside the window of the shop! The leaves are beautiful this year!! However, the downside is all the rain we've been getting - my phone has already been getting weather updates warning us of potential flooding tomorrow and Friday - Good thing I got a few pics today!
Stamps - A Muse 9-8246B Thinking of you hand
Ink - Momento Dye in Rich Cocoa
Paper - A Muse Couture Shimmer in Espresso and Grass, white cardstock, Textured Pear by Reminisce
Accessories - Basswood veneer, 1 1/4" square punch, corner rounder

Sunday, October 25, 2009

Airbrushed Fall

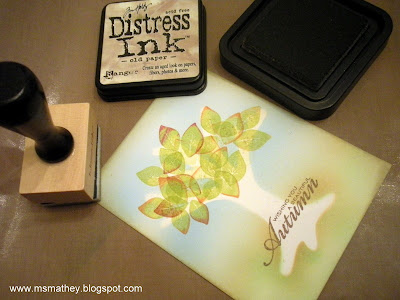
Had the urge to airbrush the other day and decided to incorporate my new Slice machine and some new A Muse stamps. First I cut out the tree shape from my Slice design card (Fall Back to School) at its biggest 4" size. After adding a little removable adhesive it was attached to a piece of white cardstock and airbrushed with Copic Markers (BG10, E53, YG11). A Muse's Leaves Trio stamps was inked in Pear Tart ink (Momento) and then rocked in rust and maroon inks and stamped randomly on the tree.
Ranger's trusty ink blending tool added a little sponged look to the edge. Stamps - A Muse 6-4168D Leaves Trio, 9-8615C Beautiful Autumn
Ink - Momento Dye Inks in Pear Tart, Potters Clay, Rhubarb Steak and Rich Cocoa, Ranger Distress Ink in Old Paper
Paper - White and kraft cardstock
Accessories - Copper cord, Copic ABS, Copic markers, Ranger Ink Blending Tool, Slice

Friday, October 23, 2009

OLD Stamper

So about 3 years ago (before Serendipity was open and I was teaching in the best store ever) Kim and I had a great lunch together and then hit a couple of antique stores. I found this cool stamper and had to take it home with me -
Did you look closely at the handle? It is a Justrite stamper!! This company has been in business for a long time -
Did I mention that it is a BIG stamp? Here it is with the new Chrysanthemum stamp from AMuse - It is just about the biggest stamp that A Muse makes and this stamper completely dwarfs it - This must have been used in a warehouse or some industrial way?? Who knows - but I love it -

Thursday, October 22, 2009

HOO loves you?!

Here is a little card I made today for my husband, Corey - I'll surprise him with it when he gets home from work. The owl was cut with my new Slice machine. What fun - he's paired up with the new A Muse Modern Wood Block stamped and embossed in white.
When you look close I backed the owl's beak and eyes with A Muse shimmer paper in Mango and Espresso and then enhanced his eyes with chocolate pearls. I thought that the owl was a little plain so I inked my Open Zinnia stamp with distress ink and stamped his belly. Gave a little subtle "faux feather" texture.
Stamps - 2-4133E Open Zinnia, 6-5066J Modern Wood Block, 8-8467B Hoo loves you
Ink - Ranger Adirondack Lights Pigment ink in Snow Cap, Momento Dye ink in Tuxedo Black,
Ranger Distress Ink in Old Paper
Paper - A Muse 4b Paprika notecard, Kraft paper, A Muse shimmer paper in Espresso and Mango
Accessories - A Muse Pretty Pearls in Chocolate, A Muse Polka Dot ribbon in White, Making Memories Slice (Fall Back to School design card), scalloped edge punch

Sunday, October 18, 2009

A Musing Calendar Class -

We were looking ahead to 2010 this week as we had the A Musing Calendar classes at Serendipity this week!

If you missed this class it's not too late - just gather a group of at least 6 people and call the shop - we can schedule your own private calendar class.

Thursday, October 15, 2009

A Muse Bouche - Part V

WOW - 5 days of peeks at the new release - Don't ya just want it all? For the final peek, I decided to do something fun and different from anything else I've done before. I was trying to decide how I could show several different shimmer papers at one time and I decided to make some paper ribbon - Here is how you do it -
First - Gather your supplies - I used a piece of white cardstock cut to 8 1/2" x 5 1/2. Then I cut varying widths of shimmer paper (from about 1/4" - 5/8") that were 8 1/2" long.

I decided to stick with a blues/greens/purple/pink palette. After arranging the paper strips in an aesthetically pleasing way (to me, anyway) I started attaching them to the base cardstock with Scor-tape. I even put a few pieces of Scor-tape as spacers (when the cardstock base was completely covered, I removed the waxed paper from the Scor-tape and poured super sparkly glitter over the sticky lines).

Lastly I used a guillotine cutter to slice the paper ribbon into 1/2" lengths - you can get a lot of paper ribbon this way! Now many of the new papers are represented. . .

Funny how such a little bit of shimmer paper can make such a big impression.
I've been staying up late every night to get my projects posted - I'm hoping to sneak in a quick nap tomorrow - I'm exhausted but has been well worth it! Be sure and check the A Muse News blog for one more terrific contest!
Stamps - 9-8616C A Muse (big) Thanks

Wednesday, October 14, 2009

A Muse Bouche - Part IV

Have you been as impressed as I have with all the amuse bouche we have been seeing? The things that have been created with the new stamps and paper are outstanding - I've been waiting with excitement to show the new Chrysanthemum stamps! When I was in the shop today I picked up some new Metallic Perfect Pearls and decided to play with them tonight - This card features the Bronze Pearls - (apparently I have a real thing about the contrast of the shimmer paper with kraft paper - Kinda like putting silk with burlap - pretty weird but I like it!)
When you angle the card you see how striking the pearls can be, especially when coupled with the A Muse Couture Shimmer paper. I cut out the panels with my Nesties and then layered a piece of acetate behind the black damask paper and added the kraft panel on top.
The piece I cut out got layered onto another card (can't waste a bit of this luscious paper). This chrysanthemum got colored with Silver Perfect Pearls. Using the Stamp-a-ma-jig ensures that your Solid and Open Chrysanthemum stamps line up perfectly!!
Don't forget to visit the A Muse blog to be in the running for a wonderful prize - ALL 5 sets of the new clear stamps!
Stamps - 6-4165J Chrysanthemum Open, 6-4166J Chrysanthemum Solid, 9-8613C Deepest Sympathy
Ink - Moment Dye ink in Tuxedo Black
Paper - A Muse Damask Couture paper in Slate, kraft paper
Accessories - A Muse Sheer Ribbon in white, acetate, Nestabilities, Perfect Pearls, Stamp-a-ma-jig

A Muse Prize Giveaway!!

Want to win a prize??!!! Believe me - you do! If you leave a comment (one per person, please) on the A Muse blog you will be entered into a drawing to win an assortment of the new shimmer paper collection! This paper is wonderful and this is a great prize!!

A Muse Bouche - Part III

Look at this beautiful Robin's Egg Shimmer Couture Damask paper - this box is much smaller than it appears in the photo - I love the little tag on it - It is made from Frosted Shrinky Dink film and is teeny tiny. I'd never used this stuff before and it was so fun! I did the shrinking with the Tim Holtz Heat Tool.
The sentiment comes from the new clear stamp set - Monogram Frames. There are so many beautiful ways to use this set - not only are there frames but 4 sentiments are included also. I paired the "Thanks so much" up with one of the new foliage stamps - this one is called Leaf Frond.
I attached it to the box with some silver cord and the A Muse Sheer White ribbon - So cute. Do you recognize the box shape?! YUP - Godiva (yumm!!). This is the size box that holds two candies. I just opened it up and laid the template on the back of the shimmer paper, traced, cut out and put together - super easy and quick! When I finished and showed it to my older son, Connor he asked, "What are you going to put in the box, mom?" His brain can't wrap around taking a picture of an empty box - boxes are only to open and get stuff out of - not to look at! hee hee
Stamps - A Muse 6-4167D Leaf Frond, Sentiment from Monogram Frames Set (clear stamp set)
Ink - Momento Pear Tart, Staz-On Black
Paper - A Muse Robin's Egg Damask
Accessories - A Muse Sheer Ribbon in white, Marvy Giga Scalloped Oval Punch, silver cord, Frosted Shinky-Dink, Heat Tool

Tuesday, October 13, 2009

AMuse Bouche - Part II

I don't think I've ever made an orange/red card before but I'm loving this combo!! The new A Muse Flatware and Thank you for everything stamps make a great "thanks for the delicious meal" card. The shimmer was hard to capture on this photo but the red/orange layers are the new Couture Shimmer papers. It is a super easy way to add elegance to a CAS card!
Stamps - 2-7195E Flatware, 9-8614C Thank you for everything
Paper - A Muse Shimmer Couture Solid paper in Apple and Mango, kraft and white cardstock
Ink - Momento Dye Inks in Ladybug, Tangelo and Tuxedo Black
Accessories - Corner rounder and popdots

Don't forget - The A 2010 Muse calendar classes are this week - Wednesday at 10:30AM and Friday at 6:00PM - I'd love to see you there - these are super fun to make - remember to download your calendar at A Muse or use the link on my sidebar!

Monday, October 12, 2009

A Muse Bouche!!


WOW!! The new A Muse release is so beautiful!! Shimmery papers galore - new pearls - new ribbons - new twinkles and best of all NEW stamps!! I got this layout from Clean & Simple FTL 60 - this is a great website to jump start your card creations!! To get the soft watercolor look on my leaves I colored my Maple Leaf Solid stamp with several Copic Markers. These are alcohol markers so you can't mist with water and stamp like you can with watercolor markers. What to do? Mist with Colorless Blender Fluid - easy when you have a Ranger Mini Mister filled with it. You can have one too when you visit Serendipity! Check out all the new peeks that the Muses will have on their blogs!!
Stamps - 9-8615C Beautiful Autumn, 6-4169D Maple Leaf Solid
Ink - Momento Bamboo Leaves
Paper - A Muse Shimmer Couture paper in Espresso, Shimmer Damask in Grass
Accessories - A Muse sheer ribbon in French Roast, A Muse Pretty Pearls in lime, Copic markers, Clear Copic Spica Marker (used on top of leaves to add additional shimmer - can't have too much shimmer!)
BTW - I do believe that this is my 100th post!!

Thursday, October 8, 2009

Sneak Peek - Calendar Class!

Here is a sneak peek of next week's calendar class - we will use our favorite A Muse stamps, Copic Markers, the A Muse gingham papers in pink, green, red, blue and yellow plus kraft papers and the bind-it-all to create this useful 2010 desk calendar. Not only is it cute and practical but A Muse is using the calendar to raise funds for a worthy cause - Water 1st.

Yesterday we had fun with Copic markers and the airbrushing tool! 2/3 of the students in class decided to purchase the Airbrush System - they will be having lots of fun!

Saturday, October 3, 2009

World Cardmaking Day


The shop was buzzing today with lots of ladies in for the secret sale and World Cardmaking Day! We sure missed Kim but she is having a blast in Houston taking classes from Tim Holtz and others - She called and said she had "inky fingers", later she reported that she had "painty fingers". Just wait until she gets back and shares all these new techniques with all of us!!