Showing posts with label tutorial. Show all posts

Sunday, September 22, 2013

Citrus Sugar

Have you ever used infused sugar?  I had heard of it but never thought to make it myself until I ran across this post last week and just had to give it a try.  
Used the trusty Microplane to zest the fruit.  The skin that got microplaned from the back of my thumb did NOT make it into my sugar. . . 
Look at the lovely fragrant piles of zest!  My kitchen smelled splendid!
Once it dried overnight and was diced up a bit the zest easily fit into two tiny bowls.
I put 2 Tablespoons of zest per one cup of sugar.  BTW - If you, like me, think that it would be so cute to cover the top of your jar lids with chalkboard paint (first prime with metal primer and then add 5 thin coats of paint) - it is seriously not worth the trouble.  Managed to scrape off part of the paint despite all my precautions - aarrgghh!!  The sugar should be ready to use in about two weeks.
Linking to Creative Every Day

Monday, July 30, 2012

Gelatin Leaf Prints

Gelatin printing!  Have you ever tried it?  Frankly, I thought it was gonna be lame but I am so happy to report that I was WRONG!! It is positively addicting and the "thrill of the reveal" never got old for me.
While there are many, many things that you can print, I stuck to leaves cause I am a botanical kinda gal.  Lots of times I fill vases with greenery only - no flowers.
Kim is my crafty cohort and came to play on Friday.  We wanted to compare her Gelli Plate with the old school technique of using gelatin.  I boiled 4 cups of water and added three boxes of gelatin (4 envelopes each for a total of 12 envelopes) - that is a seriously big gob of gelatin and it didn't all melt - that's okay - just spoon out what doesn't dissolve and throw away.  Poured it out onto a jelly roll pan and let dry overnight - no need to refrigerate.
Used a brayer and a couple colors of water-soluble print ink to ink up the gelatin.
Topped with a leafy sprig,
then a sheet of paper (5.5" x 8.25") - massage the paper to transfer the ink to your paper.
LOOK how cool once the paper is removed!
Lift up your leaf. . .
and make a second print with the leftover ink.  The good thing about using the jelly roll pan is that you can do two sheets with one inking of the brayer (total of 4 printed sheets).
Played with some stencils too and then discovered how fun it is when you multi-print a couple of times!!  That's when things started getting interesting and the printing began in earnest. . .
Here is a parade of some of my favorite prints.
plain white cardstock,
kraft cardstock,
back of an envelope,
music paper and plenty of old book paper!  This was SO much fun!!  Maybe too much fun - I printed a zillion and one sheets.
Be prepared to see leafy prints appearing pretty regularly in the future.
In case you were wondering - Kim's Gelli plate worked great.  They are expensive though and I am notoriously cheap but there is no prep or cleanup with a Gelli plate - so I may spring for one someday although realistically I have no need for more prints any time soon, ya think??
Linking to Creative Every Day.

Sunday, June 17, 2012

May Arts Challenge -

May Arts Ribbon frequently holds challenges and I finally mustered up the courage to jump in and try my hand at one.  DCWV co-sponsored this particular challenge and provided patterned paper from the Snapshot Stack.  Click here to see the original challenge post and the supplies I had to work with. . .
Decided to try my hand at making a simple set of desk accessories which I think would make a fabulous teacher gift.  My favorite part is the reworked stenographer's notebook - used wire cutters to snip out the top binding and then recovered the front with pretty patterned paper - repunched the holes with a tiny hole punch and then rebound ("modified" blanket stitch - "modified" meaning that I was too lazy to look up the correct way to do blanket stitch) with May Arts twine folded in half for extra strength.
Probably the simplest project that packs a big punch is to customize your tape dispenser.  Take the tape off the dispenser and remove the paper label - you can either trace that onto your patterned paper and cut out or do like I did - glue it directly to the paper and then cut it out.  So simple that I may just decorate all the tape dispensers around here 'cause that is cute and sometimes cute is the way to go.  
Pop over to the May Arts blog to see the winners of this challenge!

Sunday, August 14, 2011

Tuesday Trigger Trifecta

This card incorporates THREE inspirations from the fine ladies at Paper Crafts.  The first comes from the Moxie Fab Tuesday Trigger - Luminous Layers pictured below - I am enamored with this dress because it features my favorite earthy colors - cool!
The vertical panel of scallops are easily made with my scallop tutorial that was featured on the CREATE blog.  To add some zing/shine to my scallops there is a strip of copper tape at the top and bottom of the panel - this tape can be found in the stained glass section of your local hobby store.
It is no secret that I am a big fan of Teri Anderson and am inspired by her creations all the time - these fun flags are based on her recent tutorial on Paper Crafts Connection.  Last but certainly not least this card was also made for the current August Paper Crafts Gallery Challenge of Girlfriend-themed projects.
Remember when I posted about how I used up my entire marker making this?  Later that day I found out that I won the random drawing on Dina Wakley's blog Ponderings of all the fabulous things above, which includes the very markers that I used up!!!  Oh happy day!!
I was even happier when my box arrived and Dina had so kindly added some amazing Jenni Bowlin products as well!!  Dina is a terrific mixed media artist from Arizona that has a new line of stamps with Stampington and makes mixed media layering and painting seem effortless - I spend lots of happy time at her blog.  Hope you've had a great weekend!!
Stamps - PTI; Paper - Basic Grey, My Mind's Eye

Friday, August 12, 2011

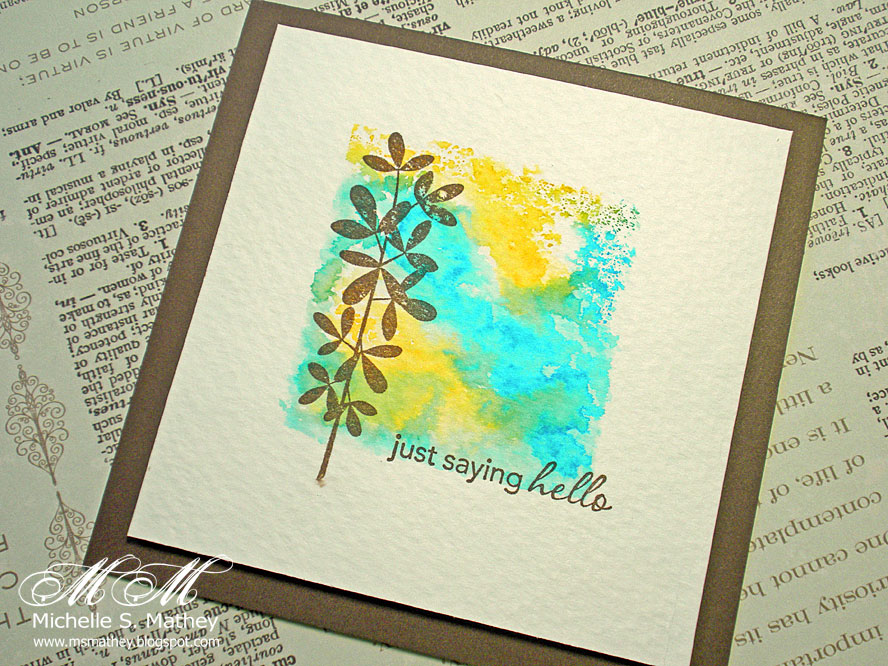
PDCC94 - Watercolored background block

Let me just start by saying that I LOVE this card - I love it so much that I would bake a cake from scratch for this card and watch while it ate it!  I love it even though it has blue in it - go figure!
The colors of Fudge, Goldenrod and Teal are courtesy of the Play Date Cafe - look how easy it is to make the colorful background -
Started with my a muse|studio 2.25" square acrylic block and scribbled two colors of Tombow Markers (443, 993) onto it and added a quick spritz of water.
Flip it over and stamp onto your watercolor paper - it can be a bit tricky - too little water and you get a spotty impression - too much water and you get a green puddle!
Used French Roast ink on some of my favorite stamp sets - amuse|studio Just Because and  Friend to Friend.  Love the sentiments from the friend to friend set - there are 6 different sentiments with that mix of script and print which is so fresh and popular now.
All supplies are available in my online a muse|studio shop!
psst - wanna know a secret?   a muse|studio is going to be releasing a supplemental catalog with new stuff including stamp sets, dies, cardstock/ink/ribbon, patterned paper, baker's twine and even felt!!  This 44 page supplemental catalog won't be going live until August 22nd but if you are nice to me and ask pretty please I can e-mail you a .pdf file of it!!  Just e-mail me at msmathey@gmail.com if you want to peek and start your wish list.

Friday, July 15, 2011

Moxie Fab Tuesday Trigger - Perty and Flirty

Today's card is for this week's Moxie Fab Tuesday Trigger - Perty and Flirty pictured below.  Mimicking the soft movement and flow of that coat with the pop of black had me thrown for a while but then I decided to make a paper "rose" with a black stamen.  There is a great video tutorial for this flower here.
I've made these flowers gobs of times and even taught them in class - so fun to see someone think that they could never make a 3-d rose from paper and then marvel at their end result!!
I use the BIG flower punch from Marvy Uchida and some soft a muse|studio Buttercup cardstock.  The entire spring collection of papers make me so happy - so sweet and soothing!  The Martha Stewart Fringe scissors made creating the stamens a breeze.  Here's how you do it -
A 3/4" wide strip of black cardstock was cut repeatedly to make the ruffly center - obviously, you could use regular scissors but if you do I will beat you in a "stamen making" race for sure - and then rolled up and secured with a dab of glue.
The pale pink background is stamped in a muse|studio shell ink (Cornish Heritage Farms Art Nouveau Backgrounder) and layered onto a solid piece of shell cardstock.  The sentment (a muse|studio Hand Scripted) is finished off with one tiny black twinkle sticker.  All in all, I am quite pleased with this card.  I was able to mimic the clean and simple aesthetic of the inspiration picture and still get the movement and pop of black I was after.  Hope you are having a terrific Friday!!

Saturday, May 14, 2011

Moxie Fab World - The Chevron Chic Challenge!

Cath is awesome at spotting trends and Chevron is one of the hottest things going - so hot that she has devoted a challenge to it on her Moxie Fab Blog - The Chevron Chic Challenge!!
I unfortunately do not have any chevron stamps but I remembered back in the recesses of my mind when Julie Fei-Fan Balzer carved her own so I decided to give it a whirl with my Speedball Stamp Making kit.  Back when I snagged this beauty in Chicago at The Paper Source I thought I was "all that" but it turns out they carry these same kits at Hobby Lobby and Blick Art Supply too.
Used my ruler and "monkey pencil" (never underestimate the importance of the right/write tools to have a successful outcome - har har) to outline where the carving needed to happen - I decided to make two stamps - one is 1" wide and the other is 1 1/2" wide.  The lines are 1/2" apart.  That way once they are both carved they can be used together -
I actually have two carving tools now so I used one with a deep v groove for the initial detail lines and the big rounded blade to quickly carve out the centers.
The wide stamp was finished and WHOO HOO!!  - successful chevron happened on the first try!!  Handcarved stamps are easily mounted onto acrylic blocks with a couple small strips of double sided sticky tape.
 Finished carving the second stamp and did a test run with both stamps together - kinda cool!
Stamped the card cover - first with Ocean then with Sky pigment inks from A Muse|Studio.  I like stamping kinda "off" so that some of the white of the base cardstock shows through.  That adds a thin white chevron stripe to the mix with no work at all!
The challenge this week at Less is More is a one-layer card with Embossing.  Heat embossing the botanical image (A Muse|Studio Beautiful Botanicals 2) with black powder adds a fun sheen against the matte blue background.  A snazzy sentiment (A Muse|Studio Monogram Frames) and a bit of Divine Twine (charcoal)  and this card is done!  It is amazing how quick it is to stamp the chevrons - so fast that I made two other cards and I'm itching to play with them again!!

Thursday, December 23, 2010

Moxie Fab Tuesday Trigger - Strictly Stripes

Tuesday Trigger time!!  This week's Moxie Fab trigger is based on the picture of the stripey, woolly mittens below -
One of the things I enjoy about trigger challenges is trying to imitate the textures represented in the photo.  Flocking would do the trick - RATS, I don't have near enough different colors of flocking - time to get crafty!
I added white flocking with adhesive spray - I actually added it in about three layers - 
That looks nice and soft, eh?
Time to crack out the Copic markers and my airbrush.  The flocking base is 3" x 3" and I made marks every 5/8" so that my stripes would be even.  I blocked off each stripe and airbrushed until my fingers were nice and "Copic-y" too - a definite hazard with the airbrush!  
 
Quick tip - I use this Elmer's Sticky Out to clean the markers from my fingers.   Smells way better than using Copic Colorless Blender and saves my blender for Copic techniques.
Adorable A Muse stamps (mittens and sentiment) finish up this fluffy card!