Sunday, April 24, 2011

Recipe 'Off Centre' - Handcarved stamp

The challenge for this week on the Less is More Challenge blog is to make cards that are "Off Centre" - We are looking for cards with little or no symmetry but perfect balance, which doesn't necessarily mean gems in all four corners, or any corners for that matter.
Do you have the new lizard stamp? Of course you don't - that's because I carved it myself!! I've been wanting to try my hand at carving a stamp for some time but couldn't think of an image to start with - Caleb drew the lizard in the above picture and I carved a stamp!
Carving your own stamp is easy. Just pencil your picture onto the provided tracing paper and then use the paper to transfer your drawing to the pink "rubber" material.
Once you've carved out your image, cut around it closely with scissors and you are done! My lizard definitely is no match for the original drawing but, all in all, you can tell that it is a lizard and that's the goal, right?
Here is what inspired the lizard stamp - Clyde. The top picture was taken on 12/05/10 and the bottom one was taken yesterday - 4/23/11. WOW!! Has he ever grown. The large rocks he was posing on in the top photo are dwarfed by him in the bottom picture. Clyde is in his new BIG tank now. I've tried to explain to Caleb that he can grow big like Clyde if he eats his greens (and crickets) daily but to no avail.

The sentiment is from the A MuseStudio stamp set - Foiled Again (Polka Dot Patterns and Woodland Friends). A lizard may not necessarily quote, "say what?" - but I say it a lot when I see how big he has gotten.

Saturday, April 23, 2011

Moxie Fab Tuesday Trigger - Crepe Bouquet

WHOO HOO!!  Check out this card - Isn't it fabulous?!  I am way obnoxiously in love with it!  It is based on the Moxie Fab Tuesday Trigger below and made from A Muse|Studio products.
This bouquet of "flowers" is made from crepe paper and was featured on the Martha Stewart Craft blog.  How fun to mimic a "paper flower bouquet" with a "paper flower" card!
Look at the elegant embossing in the background - Easily done with the A Muse|Studio Woodgrain/Harlequin Impression plate.  The sentiment is stamped/cut from the A|S Vintage Labels sets (remember last week when I said you should make extra if you are stamping/cutting - I noticed this label in my scraps and it was the perfect thing to finish off my card and bring in just a touch of white that was reflected in the A|S Buttercup Paper Flowers topped with a A|S twinkle sticker.
The gorgeous stamped flowers used three different A|S stamp sets (Marvelous Marigolds, Clever Girls and Kindred Spirits) and I managed to cut them all out.  Fussy cutting images is "not my thing" so I know that my pal, Roni, is proud of me!  A spritz of A|S Stardust Finishing Spray adds a bit of shimmer to the flowers!!
Everything used on this card is available through my A Muse|Studio online store -

Friday, April 22, 2011

OLW50 - Thankful for the Good Ol' Days

This week's One Layer Wednesday Challenge is to "pull out an old rubber stamp that hasn't seen love in a while. Dust it off, ink it up, and make a one-layer Thank You card with it"  This is a challenge that I can wrap my brain around!!
Look at these old SU! beauties - Remember Bothway Blossoms?  That stamp set dates back to 2006 and was a Hostess set that was only current for a year - I was a demo back then so was very sad to not be able to feature it at parties (it has seen a lot of love - look how beat up they look) - the Simple Shapes set is even older - 2003!!  I love pairing up these two sets to quickly color the flowers!
I can't ever seem to resist making an entire cardset when I pull these stamps out - Doesn't the A Muse|Studio Washi tape add a touch of color that finishes these cards quickly but without any extra bulky layers?

Wednesday, April 20, 2011

Less is More - Week 11 - Acetate

This week's challenge on the Less is More Challenge blog is to use acetate - A lot of people are intimidated by acetate but it can be lots of fun.  One way I like to use it is as an overlay on the front of a card.  It can be tricky to attach since you can see any adhesive used so having the scalloped layer on top is an easy way to hide it.
Have you ever embosssed acetate?  Super easy technique with a lot of presence!  It is really hard to get a good picture of this technique but it looks so cool in real life.  Washi tape added the fun stripes at the top and bottom and also afforded me the opportunity to adhere the panel at the bottom of the card too!  All supplies are from A Muse|Studio!!  Stamp sets - Friend to Friend, Ornate Elements; Washi tape; Woodgrain Embossing Plate; Medium Scallop die; Ocean ink

Monday, April 18, 2011

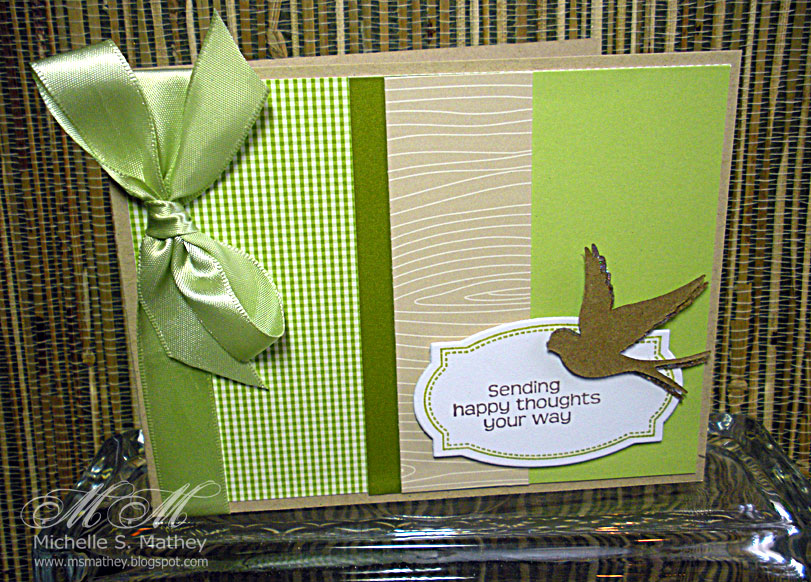
PDCC77, FTL136 - A Muse|Studio Vintage Labels/Dies

Today's card uses some of my FAVORITE new products from A Muse Studio!!  The Vintage Labels Stamp set coupled with the matching Labels dies!!  What makes them so special is the way that you use the included clear pieces to cut them out - want to see what I mean - click here!
I figure that if I'm cutting out one label I should stamp and cut out three - that way I have two in my stash for those super quick/easy cards you need in a hurry!!
Chose my colors from the Play Date Cafe Challenge.  My favorite colors are green and brown so this challenge just screamed out to me!!
Layout is courtesy of Clean and Simple Stamping's FTL136.  The A Muse|Studio swallow die replaced the button element on the sketch.  Look closely and you'll see that there are actually two swallows - I covered the first one with glitter and it got a bit too sparkly for me so I cut another one and layered it on top so just a teeny bit of the glimmer shows.
Gorgeous satin ribbon adds to the lovely layers of green!!  All supplies are from A Muse|Studio -  Stamp Sets - Vintage Labels, Good Fortune; Diecuts - Labels set, Swallows; Ink - Fern, French Roast; Diamond Glitter; Ribbon - Lichen; Cardstock - Sage, Latte Woodgrain, Fern, Grass Gingham, Kraft.

Sunday, April 17, 2011

Moxie Fab Tuesday Trigger - Porch Play

Just barely squeaking in with an entry to this week's Tuesday Trigger Challenge - Porch Play based on the photo below.  This card is pretty colorful and "different" for me but I am digging it -
The corrugated cardboard echoes the ruffles on the pillow and apron in a sophisticated way; the paper doily suggests the shape of the mirror; the linear shapes of the squares at the bottom of the card reflect the lines of the dresser; a teeny bit of yellow in the sentiment finished it up!
 The layout is based on the GS83 sketch and the colors are from the Wplus9 Design Studio Color Cue. 
This is one of those rare cards with no stamping.  Instead, I dug into my stash and played with lots of fun, neglected embellishments!  Corrugated shapes - Jillibean Soup; Cappuchino Twine - The Twinery; Letters - Basic Grey and Cosmo Cricket; Cardstock - A Muse Studio; Paper Doily - Maya Road; Jeweled Brad - Making Memories.

Friday, April 15, 2011

OLW49 - Green, Pink and Never Seen Ink

This week's One Layer Wednesday is to use Green, Pink and a stamp that's never seen ink.  Used a little "artistic license" with this challenge because if I buy a stamp - I use a stamp.  I don't have any stamps that haven't seen ink - but, I'll bet, since these stamps are from A Muse|Studio and are brand new that they may not have seen ink from any of you reading this.
The card is 4.25" square and uses a technique called reverse masking.  Pictured above is a square of computer paper - a Classic Square Nestabilities die was used to cut out the center.  That outline gets layered over your cardfront and then stamped with the a|s Harlequin background stamp.  Once the mask is removed the card is stamped only in the middle - easy peasy!
I love a background stamp but the downside of background stamps is the huge amount of space that they take up for storage - not any more - with A Muse|Studio stamps you have one big background acrylic block and clingfoam stamps that take up much less space!!
A sentiment (friend to friend), leaves (beautiful botanicals 2) and a sprinkle of twinkle stickers and this card is done!  Contact me if you are interested in ordering or learning more about opportunities with A Muse|Studio!